Knowledgebase
How to use your domain name on Blogspot / Blogger
Please follow the steps below on how you can use your domain name with Google Blogspot / Blooger.
Content from :
https://support.google.com/blogger/troubleshooter/1233381?hl=en#ts=1734115
After you've purchased your custom domain, follow the steps below:
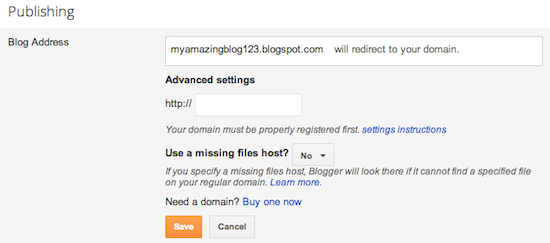
- Go to your blog and click on Basics under the Settings tab. In the "Publishing" section, click the link to add a custom domain.
- Type the url of the domain you've purchased, keeping in mind that it must begin with www in order to work.
- Click Save.
- You should see an error, and two CNAMEs listed below. Each CNAME is composed of two parts - Name, Label or Host and Destination, Target or Points to. The first CNAME is the same for everyone, Name being "www" and Destination "ghs.google.com." The second CNAME is particular to your blog and your Google Account, and is therefore different for each person.
- Go to your domain registrar's website and locate the DNS (Domain Name System) settings in the control panel.
- Now it's time to enter the CNAMEs. Where it says Name, Label or Host simply enter "www" and list ghs.google.com as the Destination, Target or Points to.
- Now enter the second CNAME in the same way.
216.239.32.21
End of optional section
216.239.34.21
216.239.36.21
216.239.38.21
- Before you move onto the final step, wait about an hour for your DNS settings to activate. If you attempt the final step before your settings are activated, we'll let you know with a warning message.
- After your settings have been activated, you need to make sure Blogger knows about your custom domain so that Google can direct readers to your blog. Just head back to Blogger and update the information on your Settings | Basic tab. Find the area for "Publishing," and click the link to add a custom domain.
Enter in the URL for your custom domain in the text box provided, and click Save.
That’s it! Your blogspot.com address will soon redirect to your new custom domain -- be patient, as it might take up to 24 hours for the redirect to start working. If you're still seeing an error after 24 hours, it means your settings weren't entered correctly and you should try the process a second time.
Some helpful notes:
- If your new domain isn't taking you to your blog, wait another day or two to make sure all the DNS servers have been updated. If it still isn't working, contact your registrar to make sure you entered the DNS settings correctly.
- Your original Blogspot address will automatically forward to your new domain. That way, any existing links or bookmarks to your site will still work.
- Your posted images will continue to display on your blog.
If you are unsure how to perform the DNS changes, please kindly contact our support for assistance at support@1host.my.
Was this answer helpful?
Also Read
Powered by WHMCompleteSolution


